
How to create volume galleries
The Volume Galleries add-on allows you to quickly build many galleries at once from images organized in a folder structure. You can choose a source gallery to act as the guide to apply settings for each of the galleries generated. An optional data CSV file will allow you to further customize each gallery that is generated.
Image Sources
Volume Galleries supports two ways to provide images for bulk gallery creation: FTP upload and Cloud Storage import.
FTP Upload
- In your FTP program, find the root folder for your WordPress installation. Look for the “wp-config.php” file – that is your root WordPress folder.
- Then navigate to “wp-content/uploads/sunshine/upload”
- Create a new folder on your server. Name the folder anything you want, but it is recommended to not use any special characters.
- Upload your images or folders of images in the new folder you just created. The file or folder name will be used to generate the name of the gallery by default.
If you organize your folders in a hierarchical structure, the generated galleries will follow that same organization.
Cloud Storage Import
If you have the Cloud Storage add-on installed and configured, you can import images directly from your cloud storage bucket instead of uploading via FTP. When Cloud Storage is active, the bulk gallery creation screen shows an option to select your cloud storage as the image source.
This is useful when you already have images organized in your cloud storage provider and want to create galleries from them without downloading and re-uploading via FTP.
Hierarchical Folder Structure
If you organize your FTP folders in a hierarchical structure, the generated galleries will follow that same organization. This means:
- Each folder you create becomes a gallery
- Sub-folders within folders become sub-galleries (child galleries) under their parent folder's gallery
- The parent-child relationship of your folders is automatically preserved in the gallery structure
For example, if you upload this structure:
wp-content/uploads/sunshine/upload/
└── wedding-photos/
    ├── ceremony/
    │   ├── image1.jpg
    │   └── image2.jpg
    ├── reception/
    │   ├── image3.jpg
    │   └── image4.jpg
    └── portraits/
        ├── couple/
        │   └── image5.jpg
        └── family/
            └── image6.jpg
Learn how to add this custom code to your WordPress website
This will create the following gallery hierarchy:
- Wedding Photos (parent gallery)
- Ceremony (sub-gallery with 2 images)
- Reception (sub-gallery with 2 images)
- Portraits (sub-gallery)
- Couple (sub-gallery of Portraits with 1 image)
- Family (sub-gallery of Portraits with 1 image)
The plugin automatically detects the folder hierarchy and sets up the parent-child relationships between galleries during the creation process. Each folder that contains images or sub-folders will become a gallery, and galleries created from sub-folders will automatically be assigned as children of the gallery created from their parent folder.
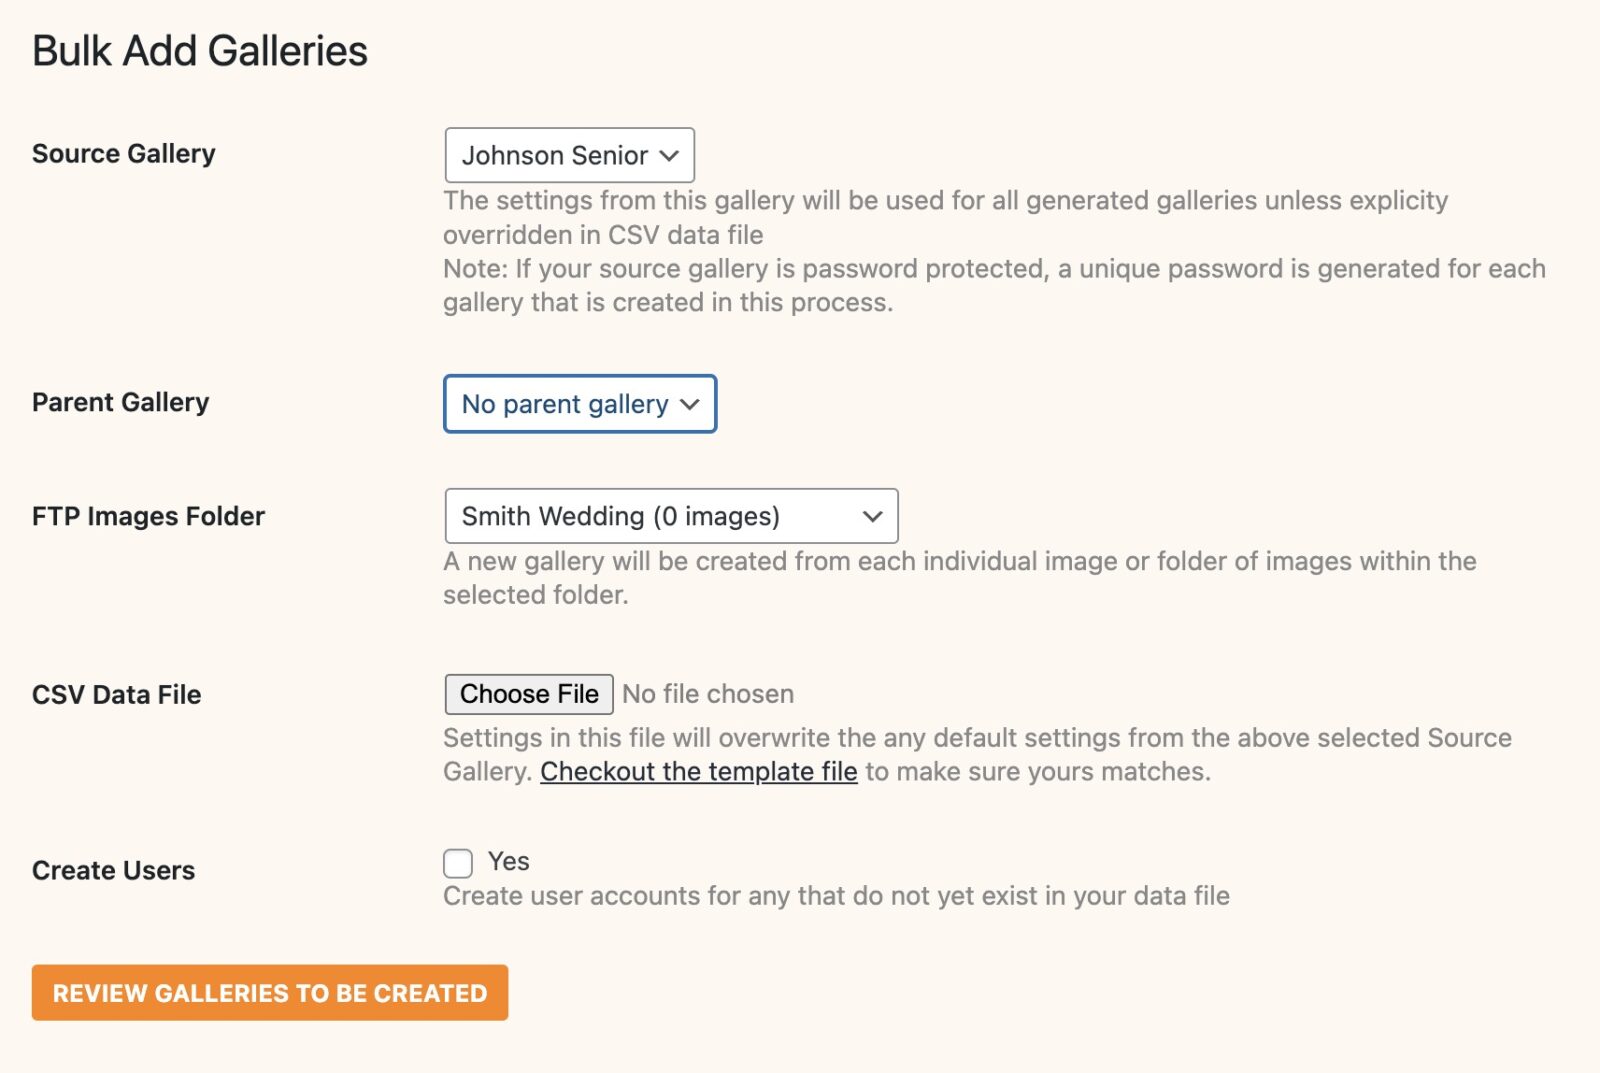
Generate Galleries
Once your images have been uploaded to the server, you can now begin the process of creating the galleries.
Go to Sunshine > Bulk Add New
- Select a source gallery which the settings for the generated galleries will be copied. You can use published, private, or draft galleries as the source.
- Optionally select a parent gallery for the generated galleries to be assigned under. Private and draft galleries can also be selected as the parent.
- Select the FTP Images Folder, the one you just uploaded*
- Optionally upload a CSV data file which will be used to customize the galleries you are creating. Download a sample CSV file. Learn more about the CSV data file and how it can be used.
- Click the "Review galleries to be created" button to be taken to a screen explaining everything that will be generated.
- If all looks good, continue and generate all the galleries.
* If you select a folder with just images and no sub-folders, a gallery for each image will be generated
Pre-processed Images
For very large imports, you can skip server-side image processing by providing pre-generated thumbnails alongside your original images. This dramatically speeds up the import process since the server doesn't need to resize each image.
To use this mode, select Pre-processed as the import mode on the bulk gallery creation screen. Your images should follow this naming convention:
image.jpg                  (original)
image-thumbnail.jpg        (pre-generated thumbnail)
image-large.jpg            (pre-generated large version)
Learn how to add this custom code to your WordPress website
Each original image should have matching -thumbnail and -large versions in the same folder. During import, the plugin uses these pre-generated files instead of creating them, which saves significant processing time when working with thousands of images.
Video Support
If you have the Video Sales add-on installed, Volume Galleries can import video files alongside your photos. During import, the plugin automatically extracts a thumbnail from each video and links the video file to the gallery image. Supported video formats follow the same formats accepted by the Video Sales add-on.
Place video files in the same folders as your images. The import process handles them alongside photos without any extra configuration.
How to use the data CSV file
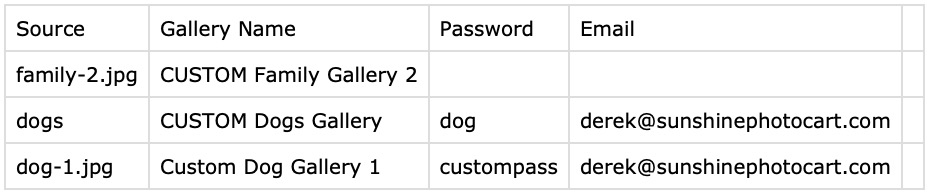
Sample data CSV file
The data CSV file can contain 4 columns:
- Source: This must exactly match an image file or folder name within the main folder. If it matches, the remaining fields will be used to overwrite the default settings.
- Gallery Name: By default, the name of the gallery is created from the file or folder name. This allows you to override this and set a custom gallery name.
- Password: If the Source Gallery chosen in the first step of this process is password protected, all subsequent galleries will also be password protected with each one getting an automatically generated unique password. This lets you specifically define the password to be used.
- Email: If you are creating user accounts to have private access to these galleries, this is the email address to be used to assign the private access. It will also be used to notify the customer about their gallery being created if you have that option checked on the first step of this process.
Still need help?
If you have not yet found your answer in the documentation articles, please contact support