
Using FTP to upload images and create galleries
FTP, or File Transfer Protocol, is a standard method used to transfer files between your computer and your web hosting. It allows you to upload, download, and manage files easily, making it a common tool for managing websites and sharing large files. With Sunshine Photo Cart, you can first upload images via FTP to your web hosting account and use that as the source to build a gallery.
If you do not know what FTP is, it is highly recommend to stick to the Browser Upload method. FTP is for more advanced users who are already familiar with using it. If you need a free FTP program, check out FileZilla.
FTP uploading is not faster or more efficient than the default browser upload and is provided for advanced users who simply prefer it.
Where to Upload Files
- In your FTP program, find the root folder for your WordPress installation. Look for the "wp-config.php" file - that is your root WordPress folder.
- Then navigate to "wp-content/uploads/sunshine/upload"
- Create a new folder on your server. Name the folder anything you want, but it is recommended to not use any special characters. Good examples would be "SmithWedding" or "smith-wedding"
- Upload your images to this folder
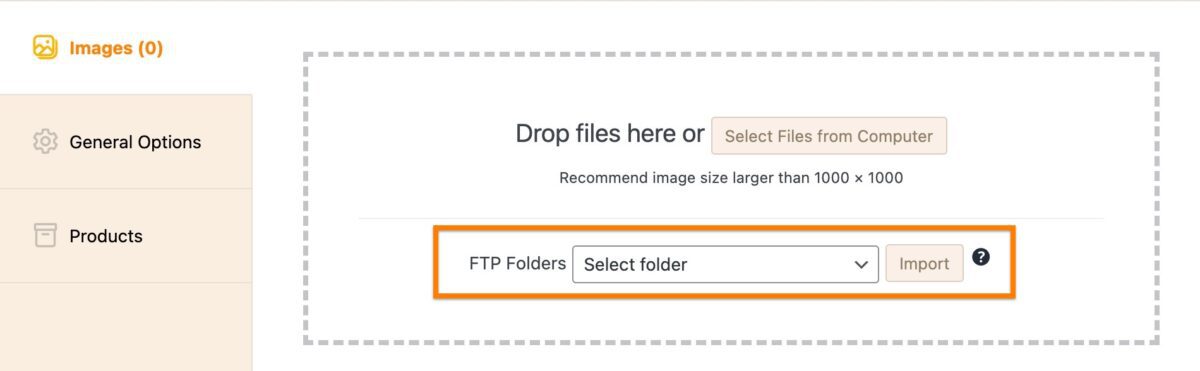
How to Select Folder as Source
In the "Images" tab, select your folder from the dropdown option and click "Import". The images will get imported into the gallery one by one automatically building the necessary images sizes for each.
Additional notes about FTP upload
After images have been imported into a gallery from your FTP folder, you now have two copies of the images on your server: 1 in the original location you uploaded them via FTP and a copied version where Sunshine needs it for the final galleries. Sunshine does not automatically delete images from the original FTP location for a variety of reasons.
It is recommended to enable the option in Sunshine > Settings > Galleries > Delete FTP folder. When enabled, if a gallery is deleted it will also delete the source FTP folder of images to help maintain smaller file storage usage on your web host. Otherwise, without this option enabled, you will need to manually delete the original FTP folder of images when you no longer need it.
Still need help?
If you have not yet found your answer in the documentation articles, please contact support