
Crop & Wall Preview
The Crop & Wall Preview add-on lets your clients choose exactly what part of a photo ends up on each print, and see that print hanging on a wall at its real size before they buy. The crop is saved with the order, so you can see it, change it, and download a cropped copy of the photo when it's time to print.
Customer cropping needs Sunshine Photo Cart 3.8.2 or newer. If your site runs an older version, you'll see a notice on Sunshine screens asking you to update.
What Your Clients See
Picking the crop
When a client opens a print in the product window (the window where they pick a product and add it to the cart), a crop box shows on their photo, right under the price. The box is locked to the shape of that print, so an 8 x 10 gets an 8 x 10 box and a 4 x 6 gets a 4 x 6 box. They drag the box to move it and drag its corners to make it bigger or smaller. A note under the photo says "Drag the box to pick what prints."
If the print isn't square, they also get Portrait and Landscape buttons, each showing the size it makes (like 8 x 10 in or 10 x 8 in). For a square print, the size shows on its own.
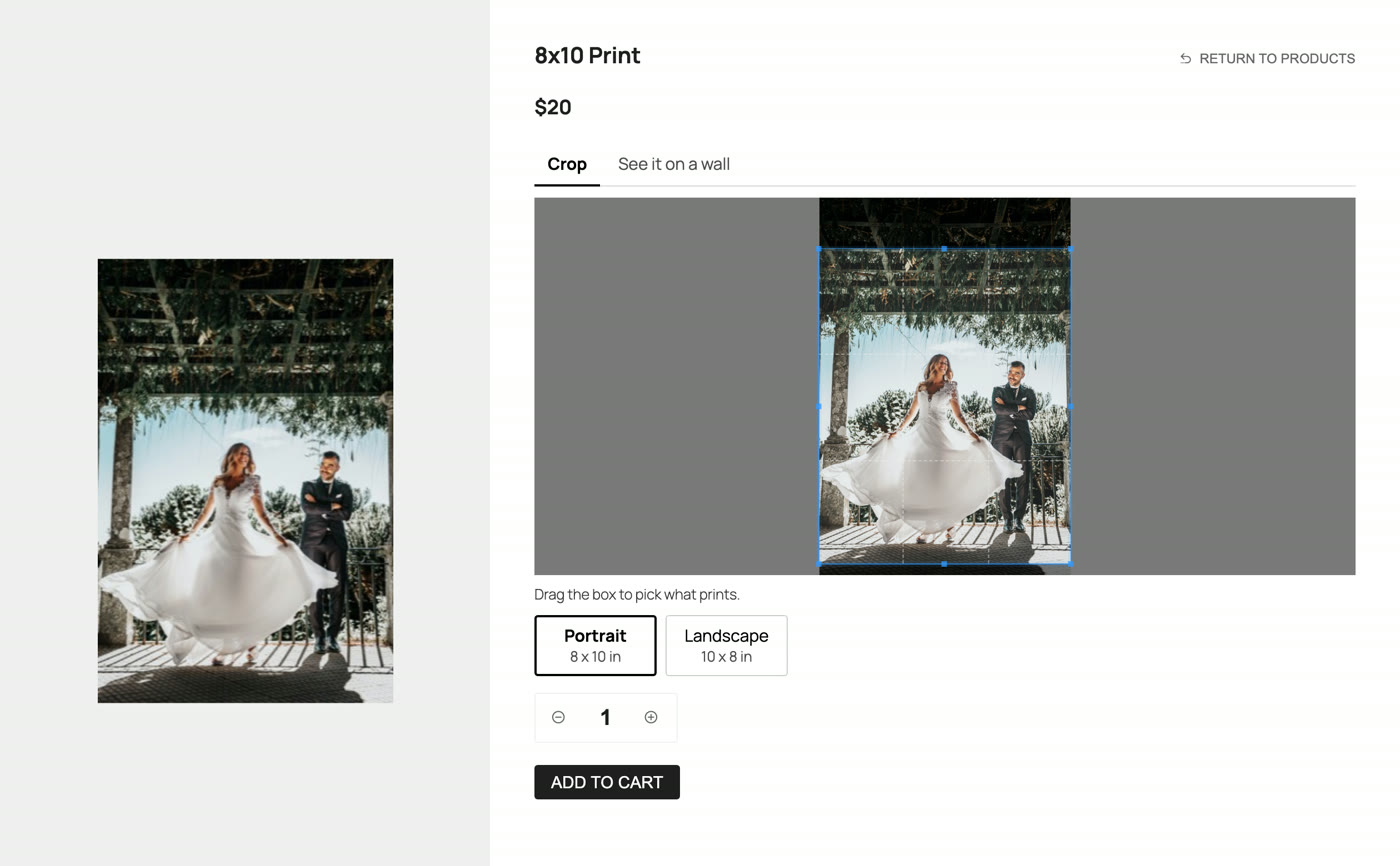
For a canvas where the photo wraps around the sides, the box covers the front and the sides. A dashed line marks the front, and a note says "Everything outside the dashed line wraps around the edges."
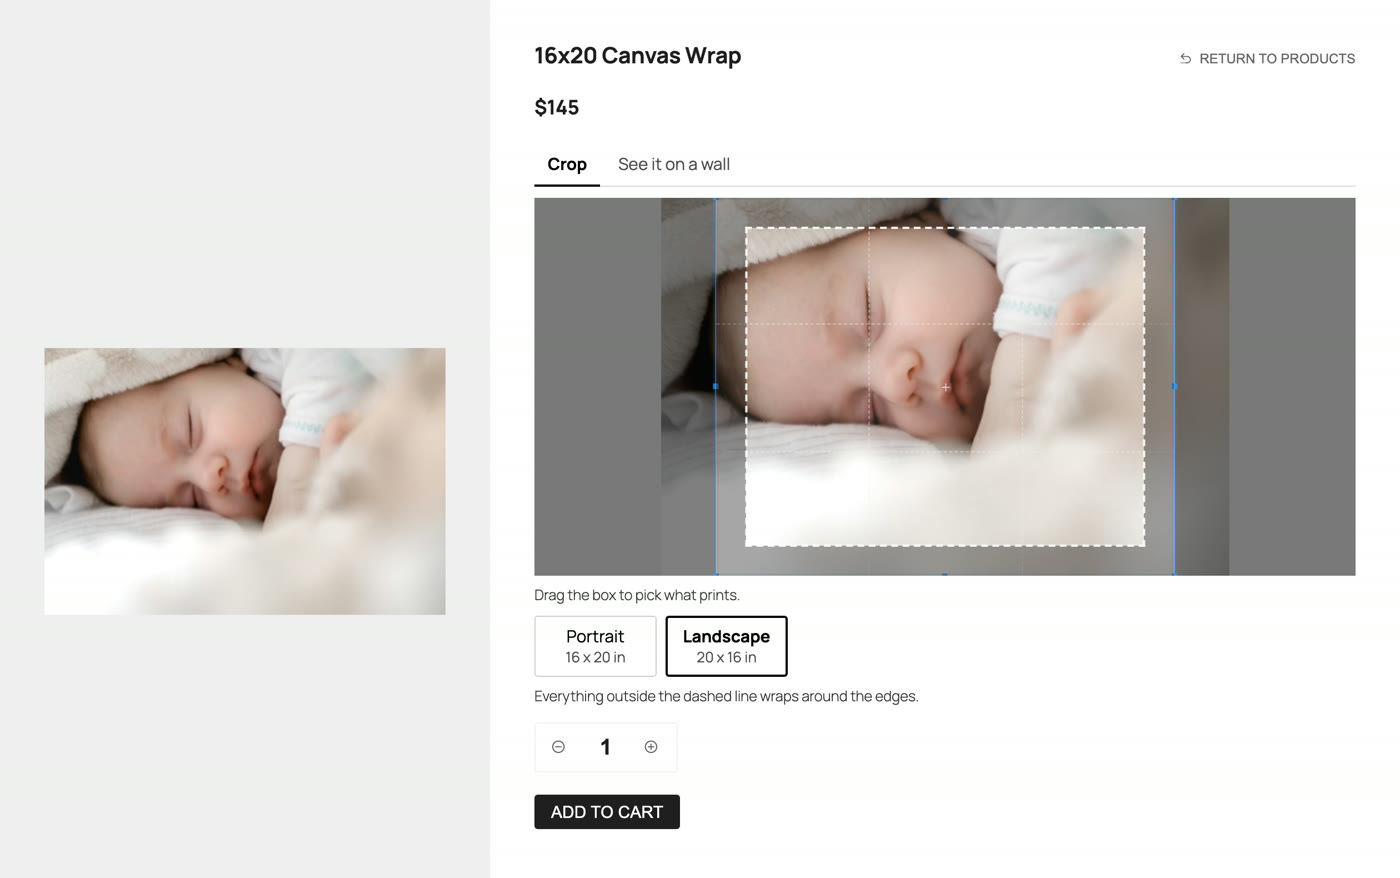
If the client doesn't touch the box, the print gets the largest crop that fits, centered on the photo.
If the client makes the box so small that the photo you uploaded doesn't have enough detail for that print size (under 150 pixels per inch), a note says "This crop may print soft at this size." They can still add it to the cart.
Changing the crop in the cart
On the cart page, each print with a size shows a small picture of what will print, a line saying "Crop: set by you" or "Crop: centered," and an Adjust crop link. The link opens the same crop box in a window, with a Save crop button.
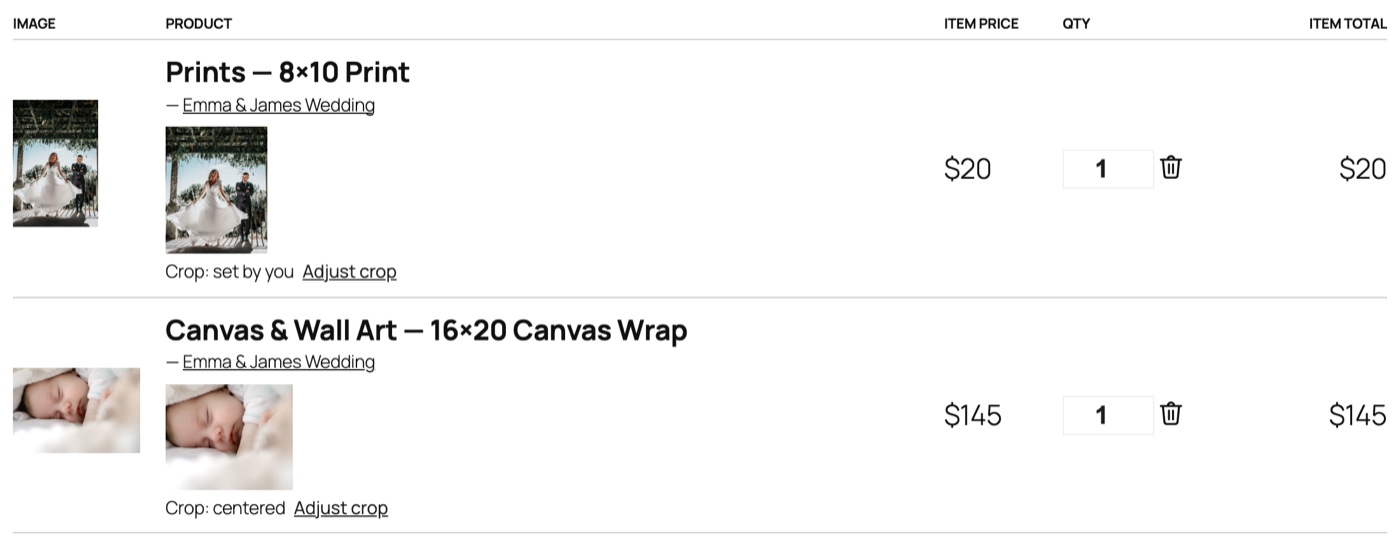
This is also how clients set crops for prints they didn't add one at a time. Prints added in bulk, from favorites, or as part of a package all start with a centered crop, and the client can adjust each one from the cart.
Seeing it on a wall
When at least one room is turned on (see Rooms below), a See it on a wall tab shows next to the Crop tab in the product window. It shows the client's crop hanging on the wall of a room photo, at its real size, with the print size written under it. When you offer more than one room, a button for each room lets the client switch between them, and their browser remembers the last room they picked.
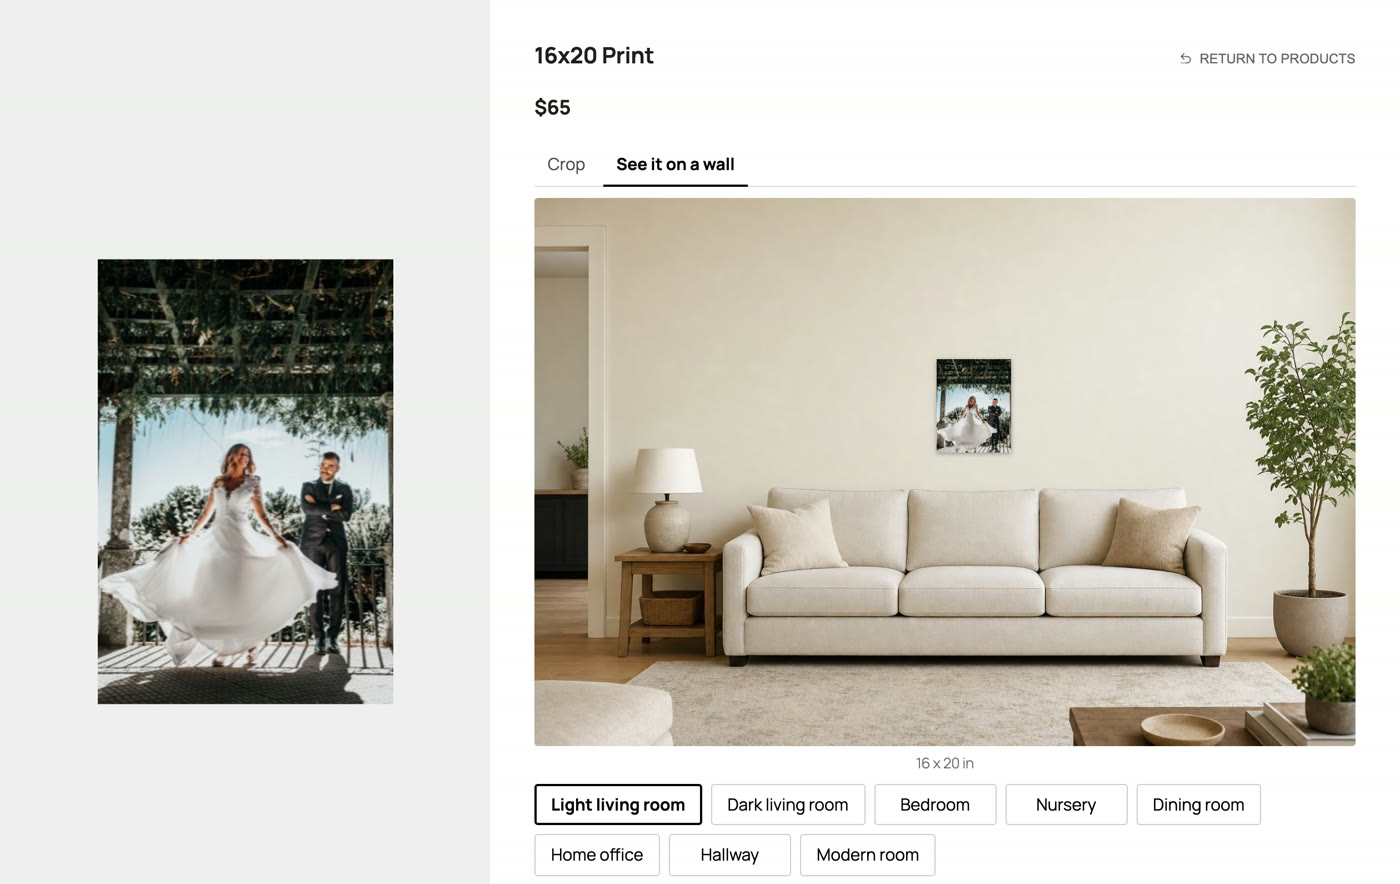
Canvas prints show a bit of their side edge so they look like a canvas, not a flat print. The wall preview follows the crop as the client moves it, so they see exactly what they're buying.
Set the Print Size on Your Products
The crop box and wall preview only show for products that have a size. Products without one work the same as always.
- Go to Sunshine > Products and edit a product.
- Make sure the Product Type is Print. Only print products get a size.
- In the Product Info box, open the Print Size tab.
- Fill in the fields:
- Width and Height: the size of the front of the print. Which one is bigger doesn't matter, since the client picks portrait or landscape.
- Unit: Inches or Centimeters.
- Edge: for canvas and similar prints. Choose None, Photo wraps around the sides, Mirrored edge or Solid color edge.
- Edge Depth: how far the edge goes around each side, in the same unit. This shows when Edge is set to anything but None.
- Update the product.
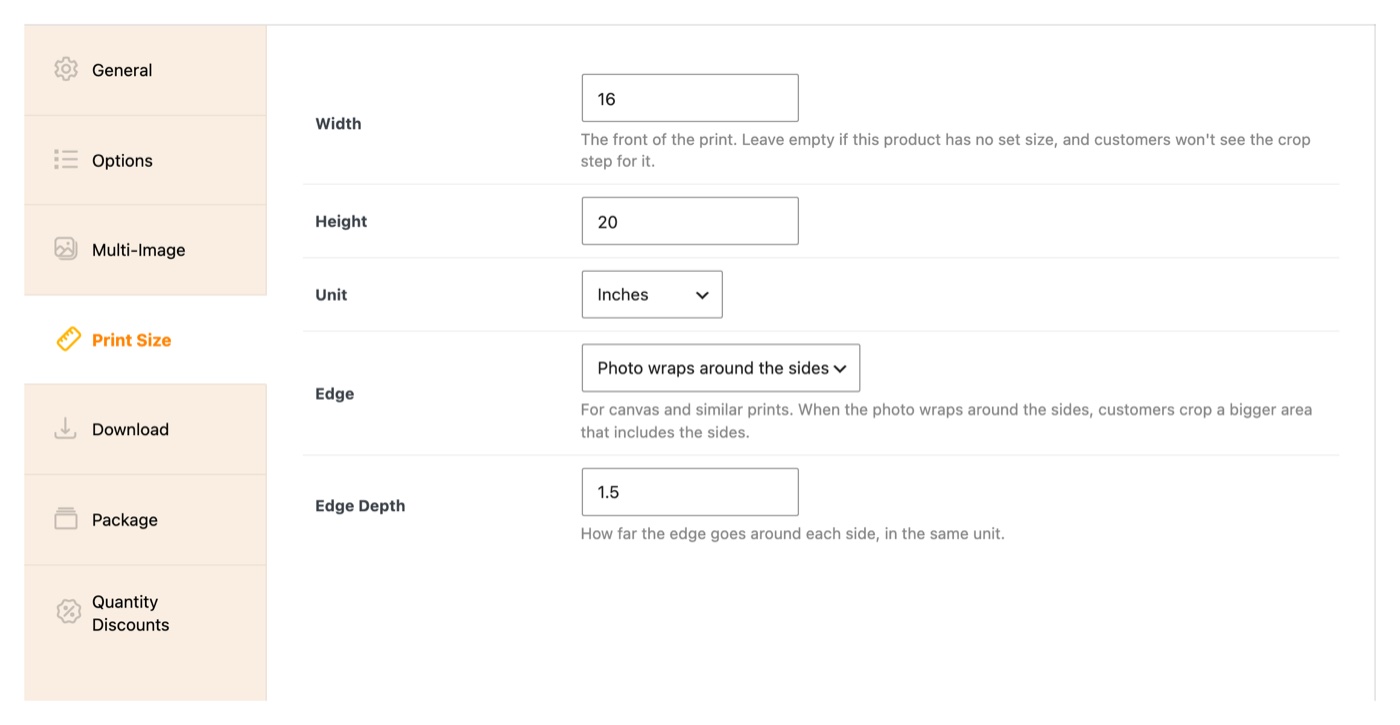
Leave Width and Height empty for any product that has no set size, like a print that the lab sizes for you.
How the edge choices work:
- Photo wraps around the sides: the client crops a bigger area that includes the sides. A 16 x 20 canvas with a 1.5 inch edge needs a 19 x 23 area of the photo.
- Mirrored edge and Solid color edge: the sides don't use any extra photo, so the client only crops the front. The wall preview still shows the edge.
A size is set on the product itself, so a product with Product Options that change the size (like one "Canvas" product with three sizes to choose from) gets the size you typed on the product for every choice. Use one product per size if you want each size cropped correctly.
Settings
Go to Sunshine > Settings > Crop & Wall Preview.
Both settings are on when you first turn on the add-on.
- Customer cropping: clients pick the part of the photo that prints. When it's off, clients don't see the crop box and get a centered crop that they can't move. Orders still save the centered crop, so you can still view, edit and download it.
- Wall preview: clients see the "See it on a wall" tab.
You can use either part on its own. With cropping off, the wall preview shows the centered crop.
Rooms
The Rooms list on the same settings screen holds the room photos clients see in the wall preview. Sunshine comes with 8 rooms, already measured and ready to use: Light living room, Dark living room, Bedroom, Nursery, Dining room, Home office, Hallway and Modern room. They're marked Default in the list, and they're all turned on until you change them, so the wall preview works as soon as the add-on is active.
Each room has a switch. Turned on, clients can pick that room. Turned off, it's hidden. The switch saves right away. Rooms you add, and any new built-in rooms in a later update, start out turned on. Turn off the ones that don't fit your clients, like the Nursery if you don't photograph babies.
Add your own room
Along with the built-in rooms, you can add any photo of a room: your studio, a client's living room, a staged room you photographed. Your rooms show after the built-in ones.
- Click Add Room.
- Type a Room name. Clients see this on the room button, so keep it short, like "Living room" or "Studio."
- Click Choose a room photo and pick or upload it from your Media Library.
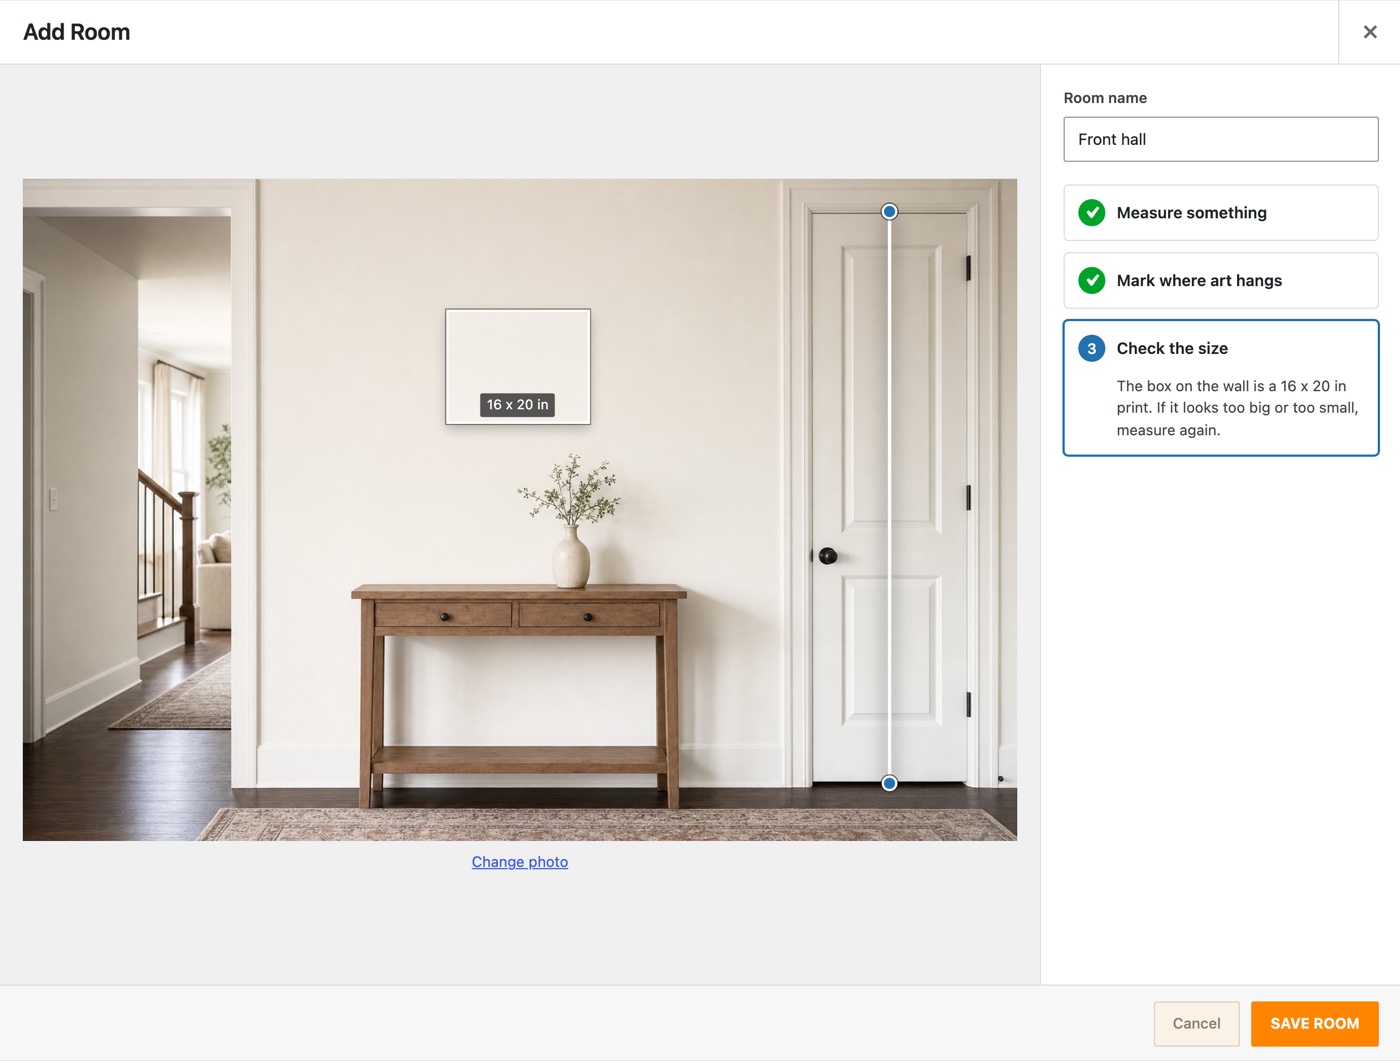
- Follow the three steps on the right side of the window (below).
- Click Save Room.
What makes a good room photo: take it straight at the wall, at eye level, with an empty stretch of wall where art can hang. A photo taken at an angle makes the print look the wrong size, because the wall is closer to the camera on one side than the other.
Step 1: Measure something
This tells Sunshine how big things are in the photo.
- Click one end of something flat on the wall that you know the size of, like a door, a window, or a frame already hanging there. Then click the other end.
- Under How long is it?, type its length and choose inches or centimeters.
Measure something that sits on the same wall where the print will hang. A couch in front of the wall is closer to the camera than the wall, so it looks bigger than it is, and prints will come out too small. A standard interior door is 80 inches (203 cm) tall in the US, which makes it an easy choice if one is in the photo.
Step 2: Mark where art hangs
Click the spot where the bottom of a picture should sit, a few inches above any furniture under it. Bigger prints grow up from there.
Step 3: Check the size
A sample print shows on the wall with its bottom on that spot: a 16 x 20 in print if you measured in inches, or 40 x 50 cm if you measured in centimeters. If it looks too big or too small for the room, go back to step 1 and measure again, or measure something else.
Edit or delete a room
Click Edit next to a room to change its name, photo, measurement or hang spot. Change photo picks a new photo, and you'll need to measure again.
Click Delete to remove a room. The photo stays in your Media Library.
The built-in rooms can't be edited or deleted. Use their switch to hide them.
What You Get on the Order
Every print with a size gets a crop saved on the order: the one the client chose, or the centered one. The print size is saved with it, so changing a product's size later doesn't change past orders.
On the order screen
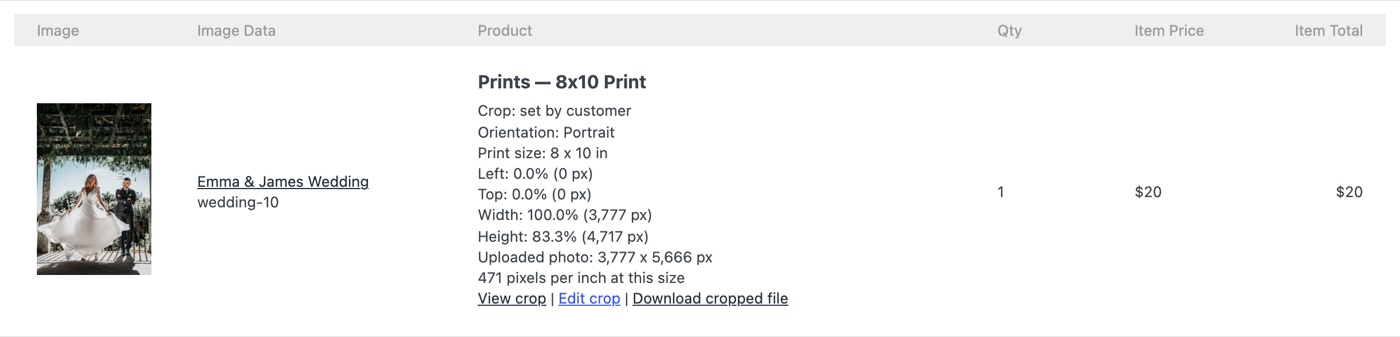
Go to Sunshine > Orders and open the order. Under each print you'll see:
- Who set the crop: Crop: set by customer, Crop: changed by photographer, or Crop: centered automatically.
- Orientation and Print size, plus how far the photo wraps for a wrapped canvas.
- Where the crop sits, as Left, Top, Width and Height, each in percent of the photo and in pixels of the photo you uploaded.
- Uploaded photo: the size of that photo in pixels.
- How many pixels per inch the print gets at that crop. Below 150, it reads Low resolution and warns that the print may look soft.
The percent numbers work on any copy of the same photo. If you uploaded a smaller copy to your gallery, use the percent to crop your full-size original the same way.
Below that are three links:
- View crop: opens a picture of the cropped photo in a new tab.
- Edit crop: opens the crop box so you can change it. It keeps the print size from the order. Click Save crop and the order's log notes that the crop changed. You can always edit here, even with customer cropping turned off.
- Download cropped file: a JPEG of your uploaded photo cut to the crop, named like
IMG_1234-crop.jpg. If the photo lives in Cloud Storage, Sunshine fetches it first.
The cropped file is only as sharp as the photo you uploaded. If you upload smaller web copies, crop your original by the percent numbers instead.
Emails and the client's order page
The client's order page and order emails show the crop line ("Crop: set by you," "Crop: changed by the photographer" or "Crop: centered"), with a small picture of the crop once one has been made. If you edit a crop, the client sees that you changed it.
Packages
With the Packages add-on, each photo picked for a print with a size in a package gets its own crop. Clients pick photos for a package the usual way, and each one starts with a centered crop. On the cart page, the package lists each of those prints by name, with a picture of each photo's crop and its own Adjust crop link.
On the order screen, each package photo shows its crop under the print's name and file name, with its own View, Edit and Download links.
Exports
With the Exports add-on, order exports include the crops. Which columns you get depends on the Line Item Format:
- Separate Rows: one row per order line, with Print Size, Orientation, Crop (who set it), Crop Left %, Crop Top %, Crop Width % and Crop Height % columns. A package line lists all its crops in the Crop column.
- Combined and Separate Columns: one Crops column listing every crop in the order. Each one gives the product, print size, orientation, who set it, and the left, top, width and height in percent.
Still need help?
If you have not yet found your answer in the documentation articles, please contact support